WELCOME!

Sit back, relax and talk beauty with the girls from ELES cosmetics
we are hear to share tips, news and special offers - any excuse to share our obsession!

Tuesday, November 29, 2011

Orange Lips! We love 'Em!!

We are readying to release our new Summer Colours for 2011 and they are divine!  A brand new shadow quad with shades of natural, bronzy hues and a lippie that you just have to look at and your mouth waters as you imagine ripe oranges, tangerines, sorbet and heaps of other Summer treats.  The look is simply.....delicious!!


I know what you are thinking...can I really wear orange lips?  Of course you can!  The trick is knowing HOW to wear it.

I know I sound all brave and adventurous here.... that is far from the truth, I'm quite conservative when it comes to makeup and wouldn't dream of setting off the yoga pants and T I wear to the shops with some tangerine kissers, however....with sedate eye makeup and orange lips lightly blotted to a more sedate shade and with some gloss over the top I'd definitely wear a fruity pout out on the town!  It's all a matter of customising the look to suit your style and colouring.

Orange lips are not Nanna!

Please get over that stubborn misconception that "orange" lips are nanna.  They are not.  Orange lips are hot. Yes, nana probably wore them or a corally version of them and the colour might even make you think of moth balls and breath mints but we love our nanna's and we should celebrate them


ARGGGHHHHH!!!


That's better :)

Different ways to wear orange...


You can wear it stark and matte


or soft and glossy


or bold and reddish


you can even wear a little pink underneath to achieve a gorgeous coral

In fact there are so many different shades of orange there is bound to be the perfect shade for you. Here is a guide that might help you find the best tone for your skin...

Fair skin with pinkish tones
Try a pinkish-orange, like tangerine, and blue-based reds and pinks.

Light skin with yellow undertones
Yellowish-oranges, and yellow-based reds and pinks are best for you

Tan skin
Corals, pumpkin-orange or reddish oranges - you can almost wear anything!

Olive skin
Reddish oranges and pinks, fire engine reds look wonderful.

Dark 
Deep, golden oranges with bright hues.

And how should you do the rest of your makeup to set off your hot lips?

The key to making a bright lip work best is to keep your eyes and face neutral.

1. Use a natural blush to bring out the subtle color of your cheeks and stay away from bright pinks. We love Mineral Gemstone Finishing Powder -Bronzer

2. If you need coverage, use a light foundation or tinted moisturizer.

3. For the eyes, pick a neutral shade that’s close to your skin tone and finish with a heavy coat of mascara. Look out for the NEW Signature Shadow Quad - Nouveau Riche

4. Go for it! Pick your favorite red, pink or even a neon orange lip-stain or lipstick. You can choose a matte color and add a clear gloss to emphasize the color. Our model is wearing ELES Micro Melon with Zesty Super Balm
Another way to see if a shade might work is by looking at which nail colors work on you. Whether the shade works can also have a lot to do with the color of your hair and/or clothing. Although you don't necessarily want to match your lip color to clothing, some lip colors complement the color of your clothes for example Melon looks great with navy blue.

So be brave! Experiment and embrace orange!  We know you'll love it.

For more information on ELES Cosmetics visit http://www.elescosmetics.com.au/ and look out for our latest COLOUR TRENDS HERE.

Friday, November 18, 2011

Four Easy Steps to Smokey Eyes

We love them. You only have to google "smokey eye" and you'll see hundreds of thousands of blog posts and YouTube Vids showing you how to create the look, so obviously you love them too!

And they are back this season with a new twist. Traditionally the look was heavy and sombre but this Summer you'll see the "soft smokey eye" the "natural smokey eye" even the "bright smokey eye" as the electric blues and peacock greens make a stunning revival.

It's easy to create but it's also very easy to get wrong!! As these two starlet's prove....erm, must have lost the blending brush!


So we'll show you how to get the perfect Smokey Eye look in just four easy steps. The colour choice is only limited by your imagination!

But first some valuble tips:

Put your foundation on last! Its a messy business creating a Smokey Eye so better to apply your eye products first, then finish with your foundation application after.

No shadow on the top part of the eye lid. The colour should be all around your eye and not going beyond the eyelid crease, unless you have very heavy lids as seen in the pics below. Resist the urge to highlight the upper lid, you'll look like Drag Queen! Unless of course you are a Drag Queen, then highlight away!

Blend, blend and blend some more. It's called smokey because it looks like a puff of smoke, it's not called "Racoon Eyes" or "Plastic from Binocula Eyes". Think heavy with soft edges.

This is what it will look like if you don't blend....


This is what it will look like if you do it right....


Notice her lips are very pale? Remember the golden rule; If the eyes are loud, tell the lips to be quiet.

What you'll need:
ELES Powder Liner in any colour
ELES Mineral Matte Eye Shadow in any darkish colour, we are using Matte Twig
ELES Lush Mascara in Black
Optional - False Eyelashes

STEP ONE: Eyes should be primed and a light layer of foundation and powder applied to help the Eye Shadow bond to the eye.

STEP TWO: Using the Powder Liner apply a generous, deep line around the entire eye contour then blend with the soft rubber tip at the end of the pencil until you have a nice thick smudgy line.


STEP THREE: Press your chosen Eye Shadow into the line and begin blending out, adding more shadow to get a deeper hue. it should be darker towards the lash line and blending out to lighter on the edges, keep applying and blending until you have the desired effect, something like this...


NOTE: The eye above is heavy lidded in other words, the natural eye crease is very low. If this is the case you may apply the shadow slightly above the crease. If they eyes are not heavy lidded try to stay below the crease with only a soft blending appearing above.

STEP FOUR: Optional - Apply False Eyelashes to the top lashline. Apply several coats of Lush Mascara to the top and bottom lashes.


Voila....The Smokey Eye!

And remember, you don't have to do it this dark, a lighter colour can be used for a softer effect.

Why do we love it?

The eye whites look whiter and the iris of the eye "pops" with vivid colour.... 

.... and because "Barbie" wears it that way!


For more information on ELES Mineral Makeup, to find your nearest stockist or purchase online, visit http://www.elescosmetics.com.au/

Monday, November 7, 2011

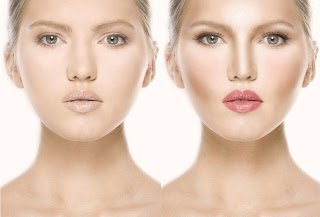
Facial Contouring like a professional!


I've had more disasters than successes when it comes to facial contouring.  Wishing I was blessed with the chiselled features of a model my face is instead full and round.  I know! we always covet what we don't have.  But refusing to accept this I've shaded and highlighted over the years in the hope of improving on what nature gave me.

Most of the time I faced the natural sunshine and flourescent lights with harsh lines and thick layers that were not visible in my flattering mirror, really they weren't!  And still I persisted. One day I would master the art of facial contouring and take 5 kilos off with makeup!

Persistence pays.  Under the wonderful guidance of a makeup guru I was instructed and the results were amazing and I know where I went wrong, I should have followed the most important principle of makeup: less is more.  Knowing exactly "where" to put the darker and lighter shades certainly helps too!

So follow us through a few easy steps and you too can have perfectly chiselled features in about 5 minutes without surgery.

The model we've chosen for this demonstration has a lovely round face, we've exaggerated the effect so you can see more clearly the placement of the product, however a lighter effect is recommended.

We used only three products to achieve this: ELES Mineral Finishing Duo Bronzer , ELES Mineral Sheer Veil in Porcelain and Mineral Matte Blush in Flirt

So lets get started: Apply your regular foundation first and allow to settle into the skin for five minutes.

STEP BY STEP FACIAL CONTOURING

Step One: Using a contouring brush apply a light layer of bronzer directly beneath the cheekbones, from the earlobes fading to the corners of the mouth.


Step Two:  Using a smaller brush, we recommend a large eyeshadow brush, apply a light application of bronzer directly down the outer contours of the nose and up towards the brow.


Step Three: Follow with a blended line sweeping across the eye contour crease to the outer eye and up towards the temples.

Step Four: Take a small amount of the Mineral Sheer Veil and apply in patting movements to the centre of the forehead above the nose and sweeping down the centre of the nose.


Step Five: Apply more Mineral Sheer Veil to the inner cheeks beside the nose and down under the nose on the upper lip.


Step Six: Finish with a light dusting of blush on the apples of the cheeks.


Finally, to define the jawline and contour the neck, simply apply a light dusting of your bronzer with a large loose brush beneath the jawline and down the sides of the neck.

Voila!! Now you should have gorgeously defined and chiselled features like our model, and the added bonus is that your features are so beautifully defined and the most you'll require to finish your makeup look is some eyeliner, mascara and lipgloss.  So good luck and get contouring!!

For more information on ELES products and stockists visit our website at http://www.elescosmetics.com.au/